


Like Hopper’s solitary figures in a barren city scene, photographs of lone trees within a landscape can offer quite a different take on the traditional dramatic vista. Whether a silhouette or a closely framed trunk full of detail, images of lone trees can convey a quiet sense of solitude and offer a more intimate view of the landscape. To help you add some variety to your landscape photography portfolio, below are 10 quick tips to help you choose your subjects, compose and set up your camera for striking photos of lone trees.
1. Shoot a lone tree through the seasons
There’s a lot to be said for getting to know your surroundings as a landscape photographer. If you have a favourite location that you know well, choose a few trees that are interesting to you and keep returning to your location throughout the year. When you photograph a lone tree as the seasons change you will begin to notice its own character start to develop. And if you don’t happen to live near a woodland, you can also shoot stunning photos of lone trees in local city parks or even by the roadside. One of the fundamental elements of strong images of lone trees is seasonal awareness. And maybe a little perfect timing!
2. Wait for the best light
And speaking of timing, plan your visits around the golden hours of early morning and late afternoon. The ethereal light at these times, beaming down from a low sun, will offer a stunning background to your images. Likewise, a sunrise or sunset can provide even more spectacular colour. If the light is too bright, try positioning your lone tree over the centre of the sun to reduce its intensity. And remember to meter for the sky to avoid losing that precious detail in the clouds.
3. Blue sky thinking
Rich, blue skies are nice, but for landscape photographers scattered clouds make all the difference. Clouds provide nice patterns and interest within the backdrop. The best way to capture the perfect cloud arrangement is to play the long game. Take a few test shots and dial in the settings you need to get an exposure you’re happy with. Then simply wait for the right cloud patterns to materialise, and then start shooting. You’ll want to look for an even balance of blue sky and cloud, as this offers the most interest to the viewer. And don’t forget to experiment with both landscape and portrait formats if time permits.
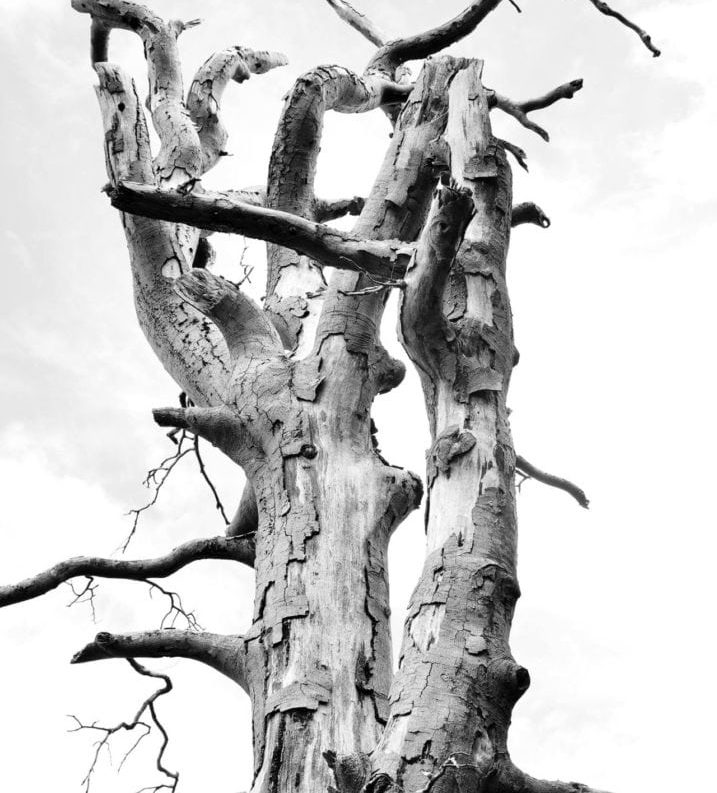
4. Monochrome
Why would you convert your images of lone trees to black and white and remove all that rich, vibrant colour of the landscape? It’s true, monochrome imagery does remove one of the elements we love most about the natural world. On the other hand, like peeling an onion, subtracting the colour from a scene reveals a new layer of interest that we often overlook. By converting your images to black and white you are helping the viewer’s eye explore the many textures and forms of your subject and its surroundings. Lone trees, in particular, work beautifully in monochrome, but remember: black and white isn’t simply a way to rescue images from flat colour or bland compositions. Monochrome is most effective when there is good light and a dynamic composition that emphasises the subject.
5. Infrared
As well as monochrome, infrared is also a powerful medium for taking photos of lone trees. Leaves and other green vegetation in your scene will be rendered a strikingly bright white that immediately draws the viewer in. There are a few ways to shoot infrared. The easiest is probably to check if your camera supports a screw-on infrared filter and buy one. The second is to simply shoot a colour image and experiment with your image-editing software. There are a few infrared plug-ins out there that can produce stunning results. The other – more complicated – way to shoot infrared is to convert an old DSLR. But be warned, once you convert a camera to shoot IR, there’s no going back!
6. Starburst effect
There are lots of ways to add a unique flourish to your scene to make it stand out from other photographs of lone trees. One such effect is to play with the position of your camera to create a starburst with the sun. Sounds complex, but it just requires a keen eye… and a sturdy tripod. Mount your camera on a tripod and frame your scene so that the sun is positioned behind a large branch within your lone tree. Next, gradually move your tripod into the sunlight so that a small sliver of the sun is visible in the frame. Set your camera to a narrow aperture of around f/16 or f/22, meter and take a test shot. You should see a very dramatic starburst effect in your image. However, it must be said that some lenses are better than others at this.
7. Shoot the moon
Quite the opposite of shooting the sun, why not try photographing a lone tree under a full moon! For the best look, frame your shot so that the moonlight is falling on your lone tree from the site. Just like sunlight, this will provide more flattering shadows. And in your skies, look for stars and constellations you can include to add interest. When setting up your camera, use manual mode and a good starting point is to shoot for 30 seconds at f/4 and ISO 800.
8. Painting lone trees with light
Another fun take on lone tree photography is to paint your subjects with light. Again at night, a white torch (flashlight) will have roughly the same colour temperature as the moon. So try setting up your shot so that your camera is shooting into the moonlight, while you use a torch to ‘paint’ light on to your lone tree. Zoom into your scene using Live View to ensure your focus is spot on, as it’s very easy to end up with soft shots using this technique.
9. Silhouettes
A silhouette is a nice way to emphasise the minimalism of a lone-tree composition. Position your camera so that you are shooting directly into the light, and then meter on the sky. Because your camera is compensating for the extreme brightness of your background, your exposure will remove all detail from the lone tree and throw it into silhouette. This can create a very powerful mood, which you can emphasise even more strongly by experimenting with your compositions. For instance, ditch the Rule of Thirds and try framing silhouettes with an even spread of lights and darks. You’ll know what looks good and what doesn’t!
10. Using polariser filters
Polariser filters are a staple of many landscape photographers’ camera bags for their ability to eliminate the reflections in water, as well as the moisture particles in the air to bring out a richer, deeper blue in the sky. Photographing trees, you’ll find that a polariser filter will reduce the reflection from leaves and other vegetation, at the same time increasing contrast around the clouds in the background to make them pop. Needless to say, a polariser can really bring a landscape to life. The effect from these filters works best when you’re shooting a lone tree at 90 degrees to the sun. However, if you’re using wide-angle lenses, be careful about vignetting in the corners of the frame.
5